Vibe Coding Handbook
Table of Contents
A practical guide to rapidly prototype ideas using AI-powered development tools, following software engineering best practices.
Overview #
This handbook provides a comprehensive guide to rapidly prototype and build functional applications using AI-powered development tools following software engineering best practices.
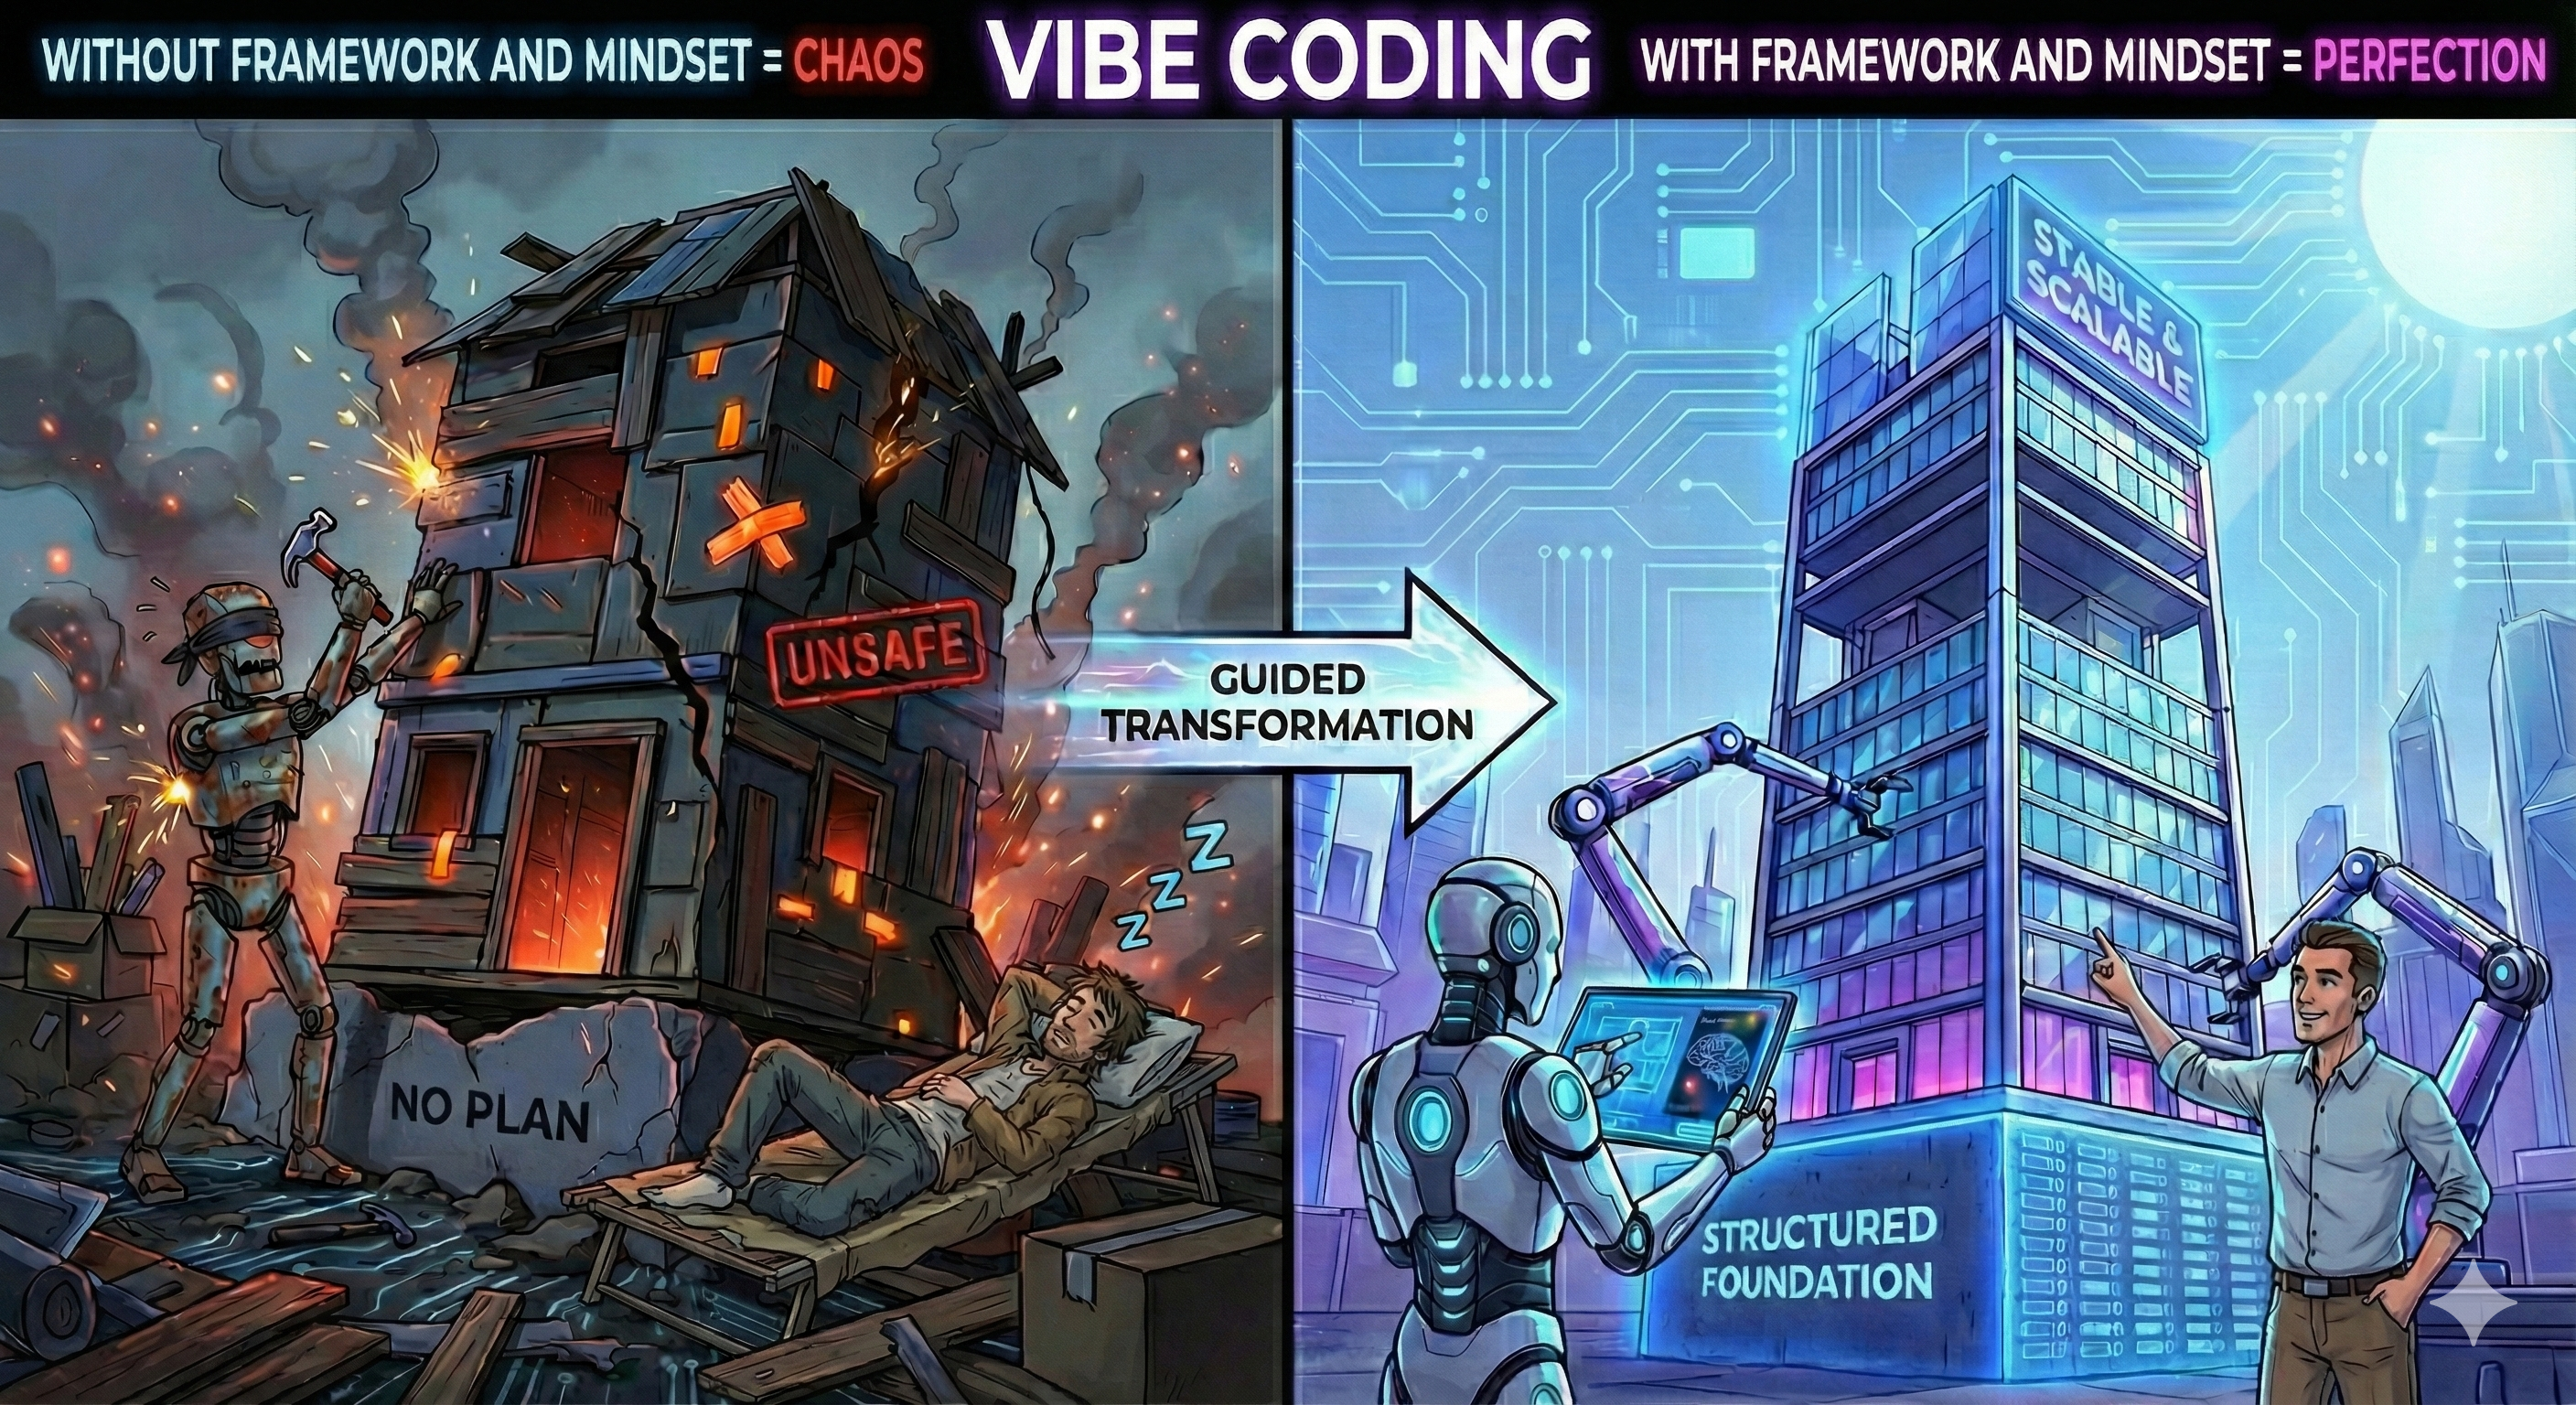
Unlike typical AI assisted coding guides that focus solely on rapid development, this handbook integrates formal Software Development Life Cycle (SDLC) principles and engineering mindset to ensure structured, secure, and maintainable applications.
What Is Vibe Coding? #
Vibe coding is a development approach where you describe what you want to build in plain English, and AI tools write the actual code for you. Instead of learning programming languages, you have conversations with AI about your requirements, and it generates the technical implementation.
As I have mentioned in this article Anyone Can Be a Programmer, why it is important to approach vibe coding with an engineering mindset and a defined framework. This handbook implements that approach, ensuring your AI-generated applications are structured, secure, scalable and professional.
How to Transform Vibe Coding into Engineering #
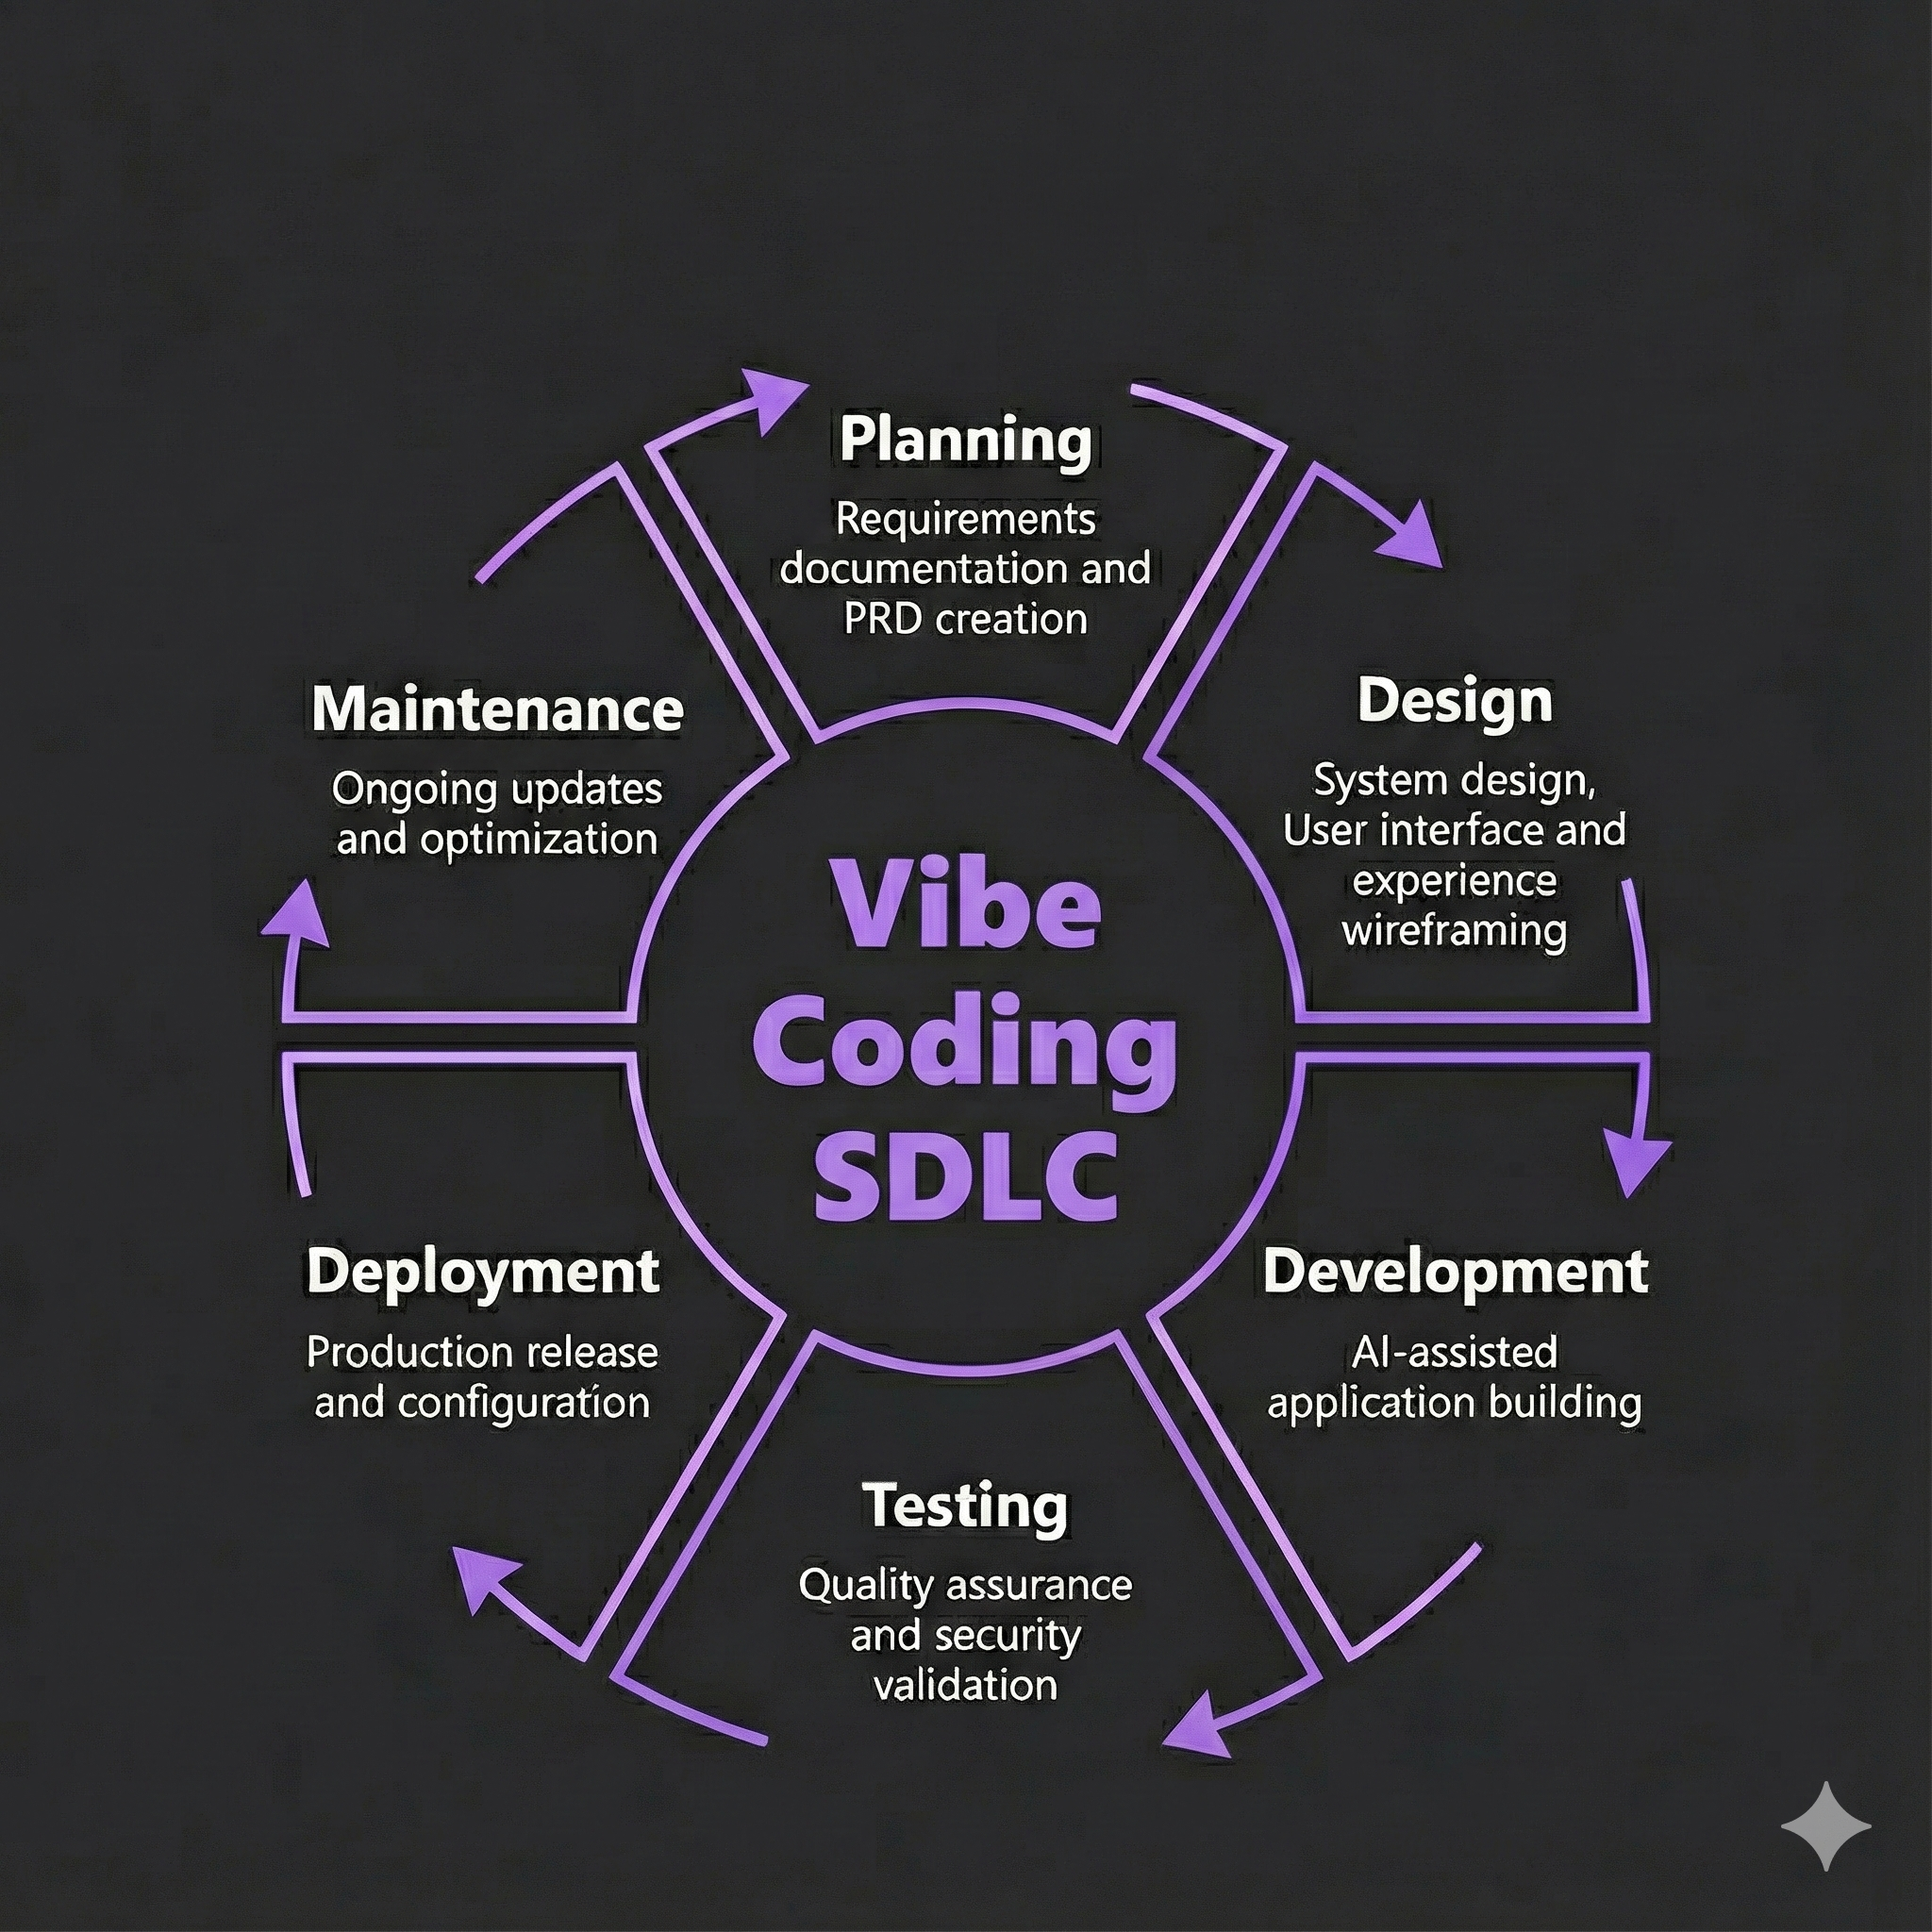
Follow Software Development Framework #
Follow each phase systematically to avoid the pitfalls of unstructured vibe coding.
- Planning - Requirements documentation and PRD creation
- Design - System design, User interface and experience wireframing
- Development - AI-assisted application building
- Testing - Quality assurance and security validation
- Deployment - Production release and configuration
- Maintenance - Ongoing updates and optimization
Each phase includes security, accessibility, and performance considerations from the start.
NOTE: Complete prompts are provided at every step for direct implementation
Engineering Mindset: #
Maintain clear separation between what AI does and what you control.
- Engineering (handled by you): Defining requirements, making design decisions, Questioning AI generated code, ensuring quality
- Implementation (handled by AI): Writing syntax, formatting code, handling technical details
Workflow Principles #
- One Feature at a Time: Complete and test each feature before adding the next
- Test Frequently: Validate after each major change
- Document Everything: Save successful prompts and important decisions
- Security First: Always consider data protection and user safety
- User-Centered: Regularly validate against user needs
Getting Started #
Prerequisites #
Before beginning vibe coding, ensure access to:
- Computer with stable internet connection
- Google account for tool authentication
NOTE: All development occurs within web-based environments, requiring no local software installation.
Choosing Your Tools #
This guide uses specific, tested tools that work best together for rapid prototyping:
AI Coding Tool: While this guide works with any AI coding assistant, for a quick start we are using Bolt.new. It is particularly good if you want to see results immediately without any setup. integrates with GitHub for version control, and supports deployment to Netlify.
Web Browser: Chrome or Edge (for developer tools)
Google Lighthouse: Built into Chrome (no installation needed) for performance and accessibility testing
Setting Up Your Workspace #
Setting Up Bolt.new
- Open your web browser
- Navigate to Bolt.new
- Click “Sign in” and create a free account using: Google account (recommended for quick setup). GitHub account (if you have one) or Email signup
Understanding Your Workspace #
Bolt.new provides everything in one interface:
- Left panel: AI Chat, Where you’ll paste the prompts from this guide
- Center: Code Editor, AI writes code here automatically
- Right panel: Live Preview, See your app update in real-time
- Top right: Deploy Button, One-click to make your app live
Implementation Guide #
Phase 1: Planning and Requirements #
Objective: Create a Product Requirements Document (PRD) that will guide all subsequent phases.
What You’ll Create: A detailed PRD document (txt, pdf or doc) generated from your high-level app idea.
1.1 Gather Your Basic App Idea #
- What problem does your app solve? (Be specific - “helps small restaurant owners track daily revenue” not just “business tool”)
- Who will use it? (Define your target user clearly)
- What are the 3-5 main things users need to do?
- What platform? (Web app, mobile, or both)
- How many users? (Estimate: 10-50, 50-100, 100-500, etc.)
1.2 Generate Your PRD Using AI #
Open your AI Coding assistant and use this comprehensive prompt (Update the sections in angular bracket):
I need you to create a comprehensive Product Requirements Document (PRD) for my app idea. Here's my basic information:

MY APP IDEA:
- App Name: <Your app name or "TBD">
- Problem it solves: <Brief description>
- Target users: <Who will use it>
- Main features I want: <List 3-5 basic features>
- Platform: <Web app, mobile app, or both>
- Rough user count: <Estimated number>

Create a detailed PRD with this exact structure:

========================================
PRODUCT REQUIREMENTS DOCUMENT
========================================

PROJECT NAME: [Generate from my app idea]
PURPOSE: [Expand into clear business purpose]
TARGET USERS: [Expand with specific characteristics]

========================================
CORE FEATURES (Must-Have)
========================================

[For each main feature, create:]
FEATURE [X]: [Feature name]
DESCRIPTION: [Detailed functionality explanation]
USER VALUE: [Why users need this]
ACCEPTANCE CRITERIA: [4-6 specific, testable requirements]

========================================
USER FLOWS
========================================

PRIMARY FLOW: [Create main user journey from start to finish]
SECONDARY FLOW: [Create second most important user journey]

========================================
TECHNICAL REQUIREMENTS
========================================

PLATFORM: [Based on my preference]
PERFORMANCE: [Specific targets for load time, responsiveness]
SECURITY: [Data security requirements appropriate for my app]
ACCESSIBILITY: [WCAG compliance requirements]
USERS: [Concurrent user support based on my estimate]

========================================
DATA REQUIREMENTS
========================================

DATA TO STORE: [List specific data types with character limits]
STORAGE METHOD: [Recommend appropriate storage for my app complexity]
INTEGRATIONS: [Suggest any needed integrations based on my features]

Make every section complete and specific enough to guide development.
1.3 Review and Refine Your Generated PRD #
- Read through the generated PRD
- Check if it captures your vision accurately
- If something doesn’t match your intent, use this refinement prompt:
PRD Refinement Prompt:
Review this PRD you created for my app. I need to adjust these parts:

[Paste the sections you want to change]

Changes needed:
- [Specific changes - e.g., "Feature 2 should focus on X instead of Y"]
- [Additional requirements - e.g., "Add integration with email"]
- [Corrections - e.g., "Target users should be X not Y"]

Please update only these sections while keeping the rest of the PRD intact.
1.4 Save Your Final PRD #
- Copy the final PRD into a text document
- Save it as “PRD-[YourAppName].txt” or Google Doc
- This document will be referenced in every subsequent phase
⚠️ Important: Your PRD is your north star. Every decision should align with it.
✅ Phase 1 Checklist:
- Basic app idea defined
- PRD generated with all sections
- PRD reviewed and refined
- PRD saved in multiple locations
- Ready to proceed to design
Phase 2: Design and User Experience #
Objective: Create visual wireframes and user interface design based on your PRD.
What You’ll Create: Detailed Visual Designs files (.html) generated from your PRD showing your complete application interface
What You’ll Use:
- Your completed PRD document from Phase 1 (have it open)
- Bolt.new for creating the design
2.1 Generate Wireframes #
Use this comprehensive design prompt with your AI Coding assistant:
I need to create wireframes and visual design for this application. Here is my complete PRD:

<PASTE YOUR ENTIRE PRD HERE>

Based on this PRD, create comprehensive wireframes with:

HOMEPAGE/DASHBOARD DESIGN:
- Header with app name from PRD
- Navigation for all major features
- Primary feature prominently displayed
- Visual hierarchy based on user priorities
- Mobile-responsive layout

[FEATURE NAME] INTERFACE:
[Repeat for each core feature from PRD]
- Input fields as specified in data requirements
- User interactions defined in acceptance criteria
- Clear call-to-action buttons
- Error states and validation messages

VISUAL STYLE:
- Professional appearance for [target users]
- Color scheme: Primary, secondary, accent colors
- Typography: Clear, readable fonts
- High contrast for accessibility
- Consistent spacing and alignment

RESPONSIVE REQUIREMENTS:
- Mobile-first design (320px minimum)
- Tablet breakpoint (768px)
- Desktop optimization (1024px+)
- Touch-friendly targets (44px minimum)

Create complete HTML structure with inline CSS styling that I can preview immediately.
2.2 Preview and Test Your Wireframes #
Use Bolt.new Built-in Preview (in the right panel) OR
Save as local html file to see the preview
- Copy all code from AI
- Create new file:
wireframe.html - Paste code and save
- Double-click file to open in browser
2.3 Refine Your Design #
Test your wireframes for:
Visual Completeness:
- All PRD features are represented
- Navigation is clear and intuitive
- Important actions are prominent
- Error states are designed
Responsive Design:
- Looks good on mobile (320px)
- Works on tablet (768px)
- Optimized for desktop (1024px+)
Refinement Prompts: #
If the first design doesn’t match your vision, refine it using these steps:
Step 1: Identify Specific Changes
Look at the generated wireframes and note exactly what needs to change:
- Layout issues (positioning, spacing, size)
- Visual problems (colors, fonts, styling)
- Missing elements from your PRD
- Mobile responsiveness issues
Step 2: Use Targeted Refinement Prompts Continue in the same Bolt.new project and use specific prompts:
For Layout Changes:
I need to adjust the layout of my wireframes:

SPECIFIC CHANGES NEEDED:
- [Element name] should be positioned [where] instead of [current position]
- [Section name] needs more/less spacing
- [Button/form] should be larger/smaller for better mobile use

Keep all other design elements the same, just fix these layout issues.
For Visual Style Changes:
I need to update the visual styling:

STYLE CHANGES:
- Change color scheme to: [specific colors]
- Update typography to: [font preferences]
- Modify [specific element] to look more [professional/modern/friendly]

Maintain the same layout and functionality, just update the visual appearance.
For Missing Features:
I noticed these elements from my PRD are missing from the wireframes:

MISSING ELEMENTS:
- [Feature name from PRD]: [specific description of what's missing]
- [UI element]: [where it should appear and how it should look]

Please add these elements while keeping all existing design intact.
Test Responsiveness After each refinement, test the wireframes on different screen sizes:
- In Bolt.new, click the mobile/tablet view buttons
- Check if all elements are readable and clickable
- If issues found, use this prompt:
The mobile version has these issues:
- [Specific mobile problems - text too small, buttons too close, etc.]
- [Elements that don't fit properly on small screens]

Please fix these mobile responsiveness issues while keeping desktop version intact.
💡 Tip: Take screenshots of designs you like for reference in future projects.
✅ Phase 2 Checklist:
- All PRD features visible in wireframes
- Colors and typography match your vision
- Mobile and desktop versions tested
- Navigation flow matches user journeys
- Design saved as HTML file
- Ready for development
Phase 3: Development #
Objective: Transform your wireframes into a fully functional application using your PRD specifications.
What You’ll Use:
- Your PRD document from Phase 1 (keep it open)
- Your Bolt.new wireframe project from Phase 2
📘 Tool Guide: Managing Long Development Sessions
**Continue in Same Bolt.new Project (Recommended)
- Context is automatically maintained
- Can reference “the wireframes we created”
- Project URL remains the same throughout
- Changes are saved automatically
Alternative: Create New Development Project
- Export your wireframes: In Phase 2 project, copy all the HTML/CSS code and save as .html files
- Start new Bolt.new project
- Paste wireframes first, then add this context prompt:
I have wireframes from a previous project that I need to make functional. Here are my wireframes:

[PASTE THE HTML/CSS CODE FROM PHASE 2 PROJECT]

This design was created based on my PRD:
[PASTE YOUR COMPLETE PRD FROM PHASE 1]
3.1 Development Strategy #
Important: Build one feature at a time, test it, then move to the next.
Feature 1 → Test → Fix → Feature 2 → Test → Fix → Feature 3...
3.2 Implement Your First Feature #
Use this structured development prompt:
Transform these wireframes into a functional application. Here's my context:

MY WIREFRAMES:
<Paste your HTML/CSS wireframes - or reference existing from Bolt.new>

MY PRD CORE FEATURES:
<Copy your entire "CORE FEATURES" section from your PRD here>

MY DATA REQUIREMENTS:
<Paste from your PRD>

IMPLEMENTATION INSTRUCTIONS:
Start with FEATURE 1: <Name from PRD>

FUNCTIONALITY TO BUILD:
- <Copy all acceptance criteria for Feature 1>
- Use local storage for data persistence
- Include input validation
- Add error handling with user-friendly messages
- Ensure mobile responsiveness
- Include loading states where appropriate

TECHNICAL REQUIREMENTS:
- <Copy your technical requirements section from PRD>
- Modern JavaScript (ES6+)
- Semantic HTML for accessibility
- Form validation before submission
- Keyboard navigation support
- ARIA labels for screen readers

DESIGN SYSTEM:
- Use shadcn/ui components for buttons, forms, modals, and inputs
- Maintain consistent styling with existing wireframe colors
- Ensure components are responsive and accessible

Build this feature completely before we add the next one.
3.4 Test Feature #
Functional Testing Steps:
Preview the Application: Click the preview/run button in Bolt.new
Test core functionality:
- Try the main user action for Feature 1 (e.g., if it’s “Add Task”, try adding a task)
- Test with different inputs (valid data, invalid data, empty fields)
- Check if data saves and displays correctly
- Test on mobile view using Bolt.new’s mobile preview
- Console errors appear in the preview panel
- Can interact directly with the application
Test Core Functionality
Test Checklist for Feature 1:
- Meets all ACs as mentioned in the PRD
- Data saves correctly
- Validation works for invalid input
- Error messages display properly
- Works on mobile screen size
Test Edge Cases
- Empty inputs
- Very long text
- Special characters
- Rapid clicking/submission
- Browser refresh (data persistence)
Fix any issues found:
The feature has this issue:
- Expected behavior: [what should happen]
- Actual behavior: [what happens]
- Error message (if any): [paste error]
- Browser console shows: [paste console output]

Please fix this issue while maintaining all working functionality.
3.5 Add Subsequent Features #
After Feature 1 works perfectly, add the next feature:
Feature 1 is working perfectly. Now add FEATURE 2: [Name from PRD]

REQUIREMENTS FOR FEATURE 2:
[Paste Feature 2 acceptance criteria from PRD]

INTEGRATION NEEDS:
- Must work with existing Feature 1
- Use same data storage method
- Maintain consistent design
- Keep all current functionality

Please implement this feature completely.
Repeat for each feature in your PRD
⚠️ Warning: Don’t skip testing between features. Bugs compound quickly.
3.6 Final Integration Testing #
Once all features are implemented:
All individual features are working. Please review the complete application and:
- Ensure all features work together seamlessly
- Add any missing integration between features
- Verify all PRD user flows are possible
- Check data consistency across features
- Confirm mobile responsiveness throughout
Make any necessary adjustments for a cohesive application.
✅ Phase 3 Checklist:
- Each PRD feature implemented
- All features tested individually
- Integration between features verified
- Data persistence working
- Mobile responsiveness confirmed
- Complete application saved locally
Phase 4: Testing and Quality Assurance #
Objective: Ensure your application meets quality standards and PRD requirements.
What You’ll Use:
- Your functional application from Phase 3 (Bolt.new project URL)
- Your PRD document from Phase 1 for validation criteria
4.1 Functional Testing Against PRD #
Create a systematic test plan from your PRD:
PRD VALIDATION CHECKLIST

FEATURE 1: [Name from PRD]
Acceptance Criteria from PRD:
□ [Criterion 1] - PASS/FAIL
□ [Criterion 2] - PASS/FAIL
□ [Criterion 3] - PASS/FAIL
Issues Found: [List any problems]

FEATURE 2: [Name from PRD]
Acceptance Criteria from PRD:
□ [Criterion 1] - PASS/FAIL
□ [Criterion 2] - PASS/FAIL
Issues Found: [List any problems]

END TO END USER FLOW TESTING:
PRIMARY FLOW: [From PRD]
□ Step 1 possible - PASS/FAIL
□ Step 2 possible - PASS/FAIL
□ Complete flow works - PASS/FAIL

SECONDARY FLOW: [From PRD]
□ Complete flow works - PASS/FAIL
4.2 Performance Testing #
Using Google Lighthouse:
Prepare for Testing
- Save your application as an HTML file (or use Bolt.new’s deployed URL)
- Open it in Chrome browser
- Ensure it’s fully loaded
Run Lighthouse Audit
- Press F12 for Developer Tools
- Find “Lighthouse” tab (may be under »)
- Configure test:
- ✓ Performance
- ✓ Accessibility
- ✓ Best Practices
- Mode: Navigation
- Device: Mobile (test mobile first)
- Click “Analyze page load”
Interpret Results
Performance Scores:
- 🟢 90-100: Excellent
- 🟡 50-89: Needs improvement
- 🔴 0-49: Poor
Key Metrics to Check:
- First Contentful Paint (target: <1.8s)
- Largest Contentful Paint (target: <2.5s)
- Total Blocking Time (target: <200ms)
- Cumulative Layout Shift (target: <0.1)
Fix Performance Issues
If score is below 80, fix with this prompt in Bolt.new:
My Lighthouse audit shows:
- Performance score: [X]
- Main issues: [List from Lighthouse]

Please optimize the code to:
- Achieve performance score above 80
- Implement these specific improvements: [List from Lighthouse]
- Maintain all current functionality
4.3 Accessibility Testing #
Using WAVE Browser Extension:
Install WAVE
- Chrome Web Store → Search “WAVE”
- Add to browser
- Pin to toolbar for easy access
Run Accessibility Check
- Open your application (local file or Bolt.new preview)
- Click WAVE icon in toolbar
- Click “Wave this page”
Understand Results
- 🔴 Red Icons (Errors): Must fix
- Missing alt text
- Empty links
- Missing form labels
- 🟡 Yellow Icons (Alerts): Should review
- Low contrast
- Redundant links
- Suspicious alt text
- 🟢 Green Icons (Features): Good accessibility
- 🔴 Red Icons (Errors): Must fix
Fix Accessibility Issues
WAVE accessibility test found these issues:
- [Number] errors: [List error types]
- [Number] alerts: [List alert types]

My PRD accessibility requirement:
[Copy accessibility requirement from your PRD]

Please fix these accessibility problems:
- Add appropriate alt text for images
- Improve color contrast (minimum 4.5:1 ratio)
- Add proper form labels
- Ensure keyboard navigation works
- Add ARIA attributes where needed

Maintain all functionality while fixing these issues.
4.4 Security Testing #
4.4.1 Manual Security Checklist: #
- No hardcoded passwords or API keys in code
- Form inputs are validated before processing
- No sensitive data in local storage (passwords, SSN, etc.)
- External links open in new tabs with
rel="noopener" - User input is never directly inserted into HTML
Basic Security Improvements:
Please review the code for security issues and:

1. Ensure all user inputs are sanitized
2. Add input validation for all forms
3. Prevent XSS attacks by escaping user content
4. Add rate limiting for form submissions (if applicable)
5. Ensure no sensitive data is exposed in code

Update the code with these security improvements.
4.4.2 Advanced Security Testing with OWASP ZAP (Optional)
Complete Instructions:
- Download ZAP: Go to zaproxy.org → Download → Choose your OS version
- Install and open: Follow installer, then launch OWASP ZAP
- Quick Start: In ZAP, click “Quick Start” tab (should be default view)
- Enter URL: Put your Bolt.new application URL in “URL to attack” field
- Run scan: Click “Attack” button and wait 5-15 minutes
- Review results: Click “Alerts” tab when scan completes
- Focus on priorities:
- High Risk: Must fix immediately
- Medium Risk: Should fix before going live
- Low Risk: Can address later
If security issues are found, fix with this prompt in Bolt.new:
My OWASP ZAP security scan found these vulnerabilities:
- [Copy alert names and descriptions from ZAP Alerts tab]

My PRD security requirements: [Copy security requirements from your PRD]

Please fix these security issues:
- Implement proper input validation for all forms
- Add security headers to prevent common attacks
- Ensure data handling meets PRD security requirements
- Maintain all functionality while improving security

Reference my PRD features to ensure no functionality is broken.
✅ Phase 4 Checklist:
- All PRD requirements tested and passing
- Lighthouse score above 80
- Zero critical accessibility errors
- Security review completed
- All issues fixed and retested
Phase 5: Deployment #
Objective: Make your application publicly accessible.
5.1 Prepare for Deployment #
Pre-Deployment Checklist:
- Application works locally
- All features tested
- No console errors in browser
- Mobile responsive design confirmed
- PRD requirements met
5.2 Deployment #
Bolt.new Direct Deployment (Fastest) #
Steps:
- In your Bolt.new project, click “Publish” button, on the top right corner of the screen
- Wait for Bolt to compelte the deployment:
- Get your URL:
- Format:
https://abc.bolt.host/ - Live in 1-2 minutes
- Format:
- Future updates:
- Make changes in Bolt.new
- Click “Publish” again to update
- Custom Domain (Optional)
- Add custom domain in settings
- Follow DNS instructions
Option 2: Netlify Instant Drop #
Pros: Instant deployment, no Git required
📖 **Complete Netlify Drop Setup**
Prepare Files: Export from Bolt.new :
- To export code from Bolt.new, click your project’s title in the top-left corner, then select Export > Download to get a .zip file of your code
- Extract the zip on desktop
Deploy with Drag-and-Drop
- Go to app.netlify.com/drop
- Drag your
distfolder onto the browser window or Clickbrowse to uploadand select youdistfolder. - Wait for upload (few seconds)
Get Your URL
- Random URL appears immediately
- Works for 1 hours without account
- Test all features
Update Site
- Drag new folder version
- Or use Netlify dashboard
Make It Permanent (Optional)
- Click “Sign up for free”
- Create free Netlify account
- Site becomes permanent
Custom Domain (Optional)
- Add custom domain in settings
- Follow DNS instructions
5.3 Post-Deployment Testing #
Critical: Test your live site immediately:
Functional Testing #
⚠️ Warning: Verify Deployment immediately Against PRD
LIVE SITE TESTING CHECKLIST:
Using my PRD from Phase 1, verify each feature works on the live site:

CORE FEATURE 1: [Name from PRD]
✓ Works on live site: [Yes/No]
✓ Meets PRD acceptance criteria: [Yes/No]

CORE FEATURE 2: [Name from PRD]
✓ Works on live site: [Yes/No]
✓ Meets PRD acceptance criteria: [Yes/No]

[Continue for all PRD features]

TECHNICAL REQUIREMENTS FROM PRD:
✓ Mobile responsive: [Test on phone]
✓ Load time under [X seconds from PRD]: [Actual time]
✓ All user flows work: [Test each flow from PRD]
Run Non Functional Testing: #
- Lighthouse: Use Chrome lighthouse to test the live URL for performance issues. It should match Phase 4 results locally.
- Mobile test: Open live URL on your phone
- Cross browser testing: Test in Chrome, Safari, Firefox
- Accessibility Testing: Use Chrome lighthouse to test the live URL for acessbility issues. It should match Phase 4 results locally.
Share for Feedback (Optional) #
- Send URL to 2-3 friends
- Ask them to test basic features
- Note any issues they find
If issues appear only on live site:
My application works locally but has these issues when deployed:
- Issue 1: [Description]
- Issue 2: [Description]
- Deployment platform: [Bolt.new/Netlify/etc.]

Please help fix these deployment-specific issues.
✅ Phase 5 Checklist:
- Code prepared for deployment
- Deployment platform chosen
- Application successfully deployed
- Live URL tested and working
- URL saved and documented
Phase 6: User Acceptance Testing #
Objective: Validate that real users can successfully use your application.
What You’ll Use:
- Your live application URL from Phase 5
- Your PRD from Phase 1 (specifically user and business objectives)
6.1 Prepare for User Testing #
Create Your Test Plan:
USER TEST PLAN

APPLICATION: [Name]
URL: [Your live URL]
TARGET USERS: [From PRD]

TEST SCENARIOS:
Scenario 1: [Main user flow from PRD]
- Start: Homepage
- Goal: [What user should accomplish]
- Success: [What indicates success]

Scenario 2: [Secondary flow from PRD]
- Start: [Starting point]
- Goal: [What to accomplish]
- Success: [Success indicator]

FEEDBACK QUESTIONS:
1. Could you complete the task?
2. What was confusing?
3. What did you like?
4. What would you change?
5. Would you use this application?
6.2 Find Test Users #
Recruiting Testers:
- Friends or family who match target user profile
- Social media groups related to your app’s purpose
- Local community members
- Colleagues (for business tools)
Ideal Number: 3-5 testers
6.3 Conduct Testing #
Testing Instructions for Users:
Hi! I need your help testing my new application.

WHAT IT DOES: [Brief description from PRD]

YOUR TASK:
1. Go to: [your URL]
2. Try to: [Specific task from scenario]
3. Don't worry about making mistakes
4. Note anything confusing

AFTERWARDS:
Please tell me:
- Were you able to complete the task?
- What was confusing or difficult?
- What did you like?
- Any suggestions?

Thank you for your help!
6.4 Collect and Analyze Feedback #
Feedback Collection Template:
USER FEEDBACK SUMMARY

TESTER 1: [Name/Identifier]
- Task Completed: Yes/No/Partially
- Time Taken: [X minutes]
- Confusion Points: [List]
- Positive Feedback: [List]
- Suggestions: [List]
- Would Use Again: Yes/No

[Repeat for each tester]

COMMON ISSUES:
1. [Issue mentioned by multiple users]
2. [Another common issue]

PRIORITY FIXES:
High: [Blocks core functionality]
Medium: [Causes confusion]
Low: [Nice to have]
6.5 Implement Critical Fixes #
Focus only on HIGH priority issues:
📘 **Tool Guide: Making Updates After Deployment**
Bolt.new:
- Open your existing project
- Make fixes in the same session
- Test in preview
- Click “Deploy” again to update live site
GitHub Pages:
- Update your local HTML file
- Upload new version to GitHub
- Changes deploy automatically
Netlify:
- Update code locally
- Drag new folder to Netlify Drop
- Or update through dashboard
General Approach:
- Fix issues in your AI tool
- Test thoroughly
- Re-deploy using same method
Based on user testing of [Application Name], these critical issues need fixing:

USER FEEDBACK SUMMARY:
- [X] out of [Y] users couldn't complete [task]
- Multiple users confused by [specific element]
- Users expected [behavior] but got [other behavior]

REQUIRED FIXES:
1. [Most critical issue]
   - Current behavior: [what happens now]
   - Expected behavior: [what users expect]

2. [Second critical issue]
   - Current behavior: [description]
   - Expected behavior: [description]

Please fix these issues while maintaining all working functionality.
6.6 Final Validation #
After fixes, test with at least one user to confirm improvements:
- Send updated URL
- Ask to retry the problematic task
- Confirm issue is resolved
✅ Phase 6 Checklist:
- Test scenarios created from PRD
- 3-5 users completed testing
- Feedback documented
- Critical issues identified
- High-priority fixes implemented
- At least one user validated fixes
- Application meets PRD objectives
Phase 7: Maintenance and Updates #
7.1 Regular Maintenance Schedule #
Weekly Tasks (15 minutes) #
- Visit live application
- Test core features
- Check for user feedback
- Note any issues
Monthly Tasks (1 hour) #
- Run Lighthouse audit
- Compare to baseline scores
- Test all user flows
- Review user feedback
- Plan improvements
Quarterly Tasks (2-3 hours) #
- Comprehensive testing
- User feedback analysis
- Feature prioritization
- Performance optimization
- Security updates
7.2 Adding New Features #
When to Add Features #
- Multiple users request same functionality
- Feature aligns with PRD objectives
- Current application is stable
- You have time for proper testing
Feature Addition Process #
Open your existing project URL in Bolt.new:
Continue in the same session
Update Your PRD
Add this new feature to my application:

CURRENT STATE:
- Working features: [List current features]
- Live URL: [Your deployment URL]

NEW FEATURE:
[Paste feature requirements]

CONSTRAINTS:
- Maintain all current functionality
- Keep same design style
- Ensure mobile responsiveness
- Don't break existing data
Reiterate from Phase 2
7.3 Handling User-Reported Issues #
Issue Triage Process #
Priority Levels:
- 🔴 Critical: Feature completely broken
- 🟡 Major: Feature partially working
- 🟢 Minor: Cosmetic or enhancement
Issue Resolution Template:
USER REPORTED ISSUE:

Description: [What user reported]
Feature Affected: [Which PRD feature]
Steps to Reproduce: [How to see the issue]
Expected Result: [What should happen]
Actual Result: [What actually happens]
Priority: [Critical/Major/Minor]

Please fix this issue while maintaining all other functionality.
Best Practices and Tips #
Effective Prompting Strategies #
The Five Principles of Good Prompts #
Be Specific
- ❌ “Make it better”
- ✅ “Improve load time by optimizing images and minimizing JavaScript”
Provide Context
- ❌ “Add a form”
- ✅ “Add a contact form with name, email, and message fields that saves to local storage”
Set Constraints
- ❌ “Fix the bug”
- ✅ “Fix the bug while maintaining all current features and mobile responsiveness”
Include Examples
- ❌ “Make it look professional”
- ✅ “Style like a professional SaaS application with blue primary color and clean spacing”
Request Validation
- ❌ “Add validation”
- ✅ “Add form validation that checks for valid email format and required fields with user-friendly error messages”
Common Pitfalls and Solutions #
| Pitfall | Solution |
|---|---|
| Scope Creep | Stick to your PRD, resist adding “just one more feature” |
| Skipping Tests | Test after each feature, not at the end |
| Ignoring Performance | Check Lighthouse scores regularly |
| Poor Documentation | Save successful prompts and important decisions |
| No User Testing | Even 2-3 testers are better than none |
| Hardcoded Data | Always use variables and configuration |
| Missing Error Handling | Add user-friendly error messages everywhere |
Building Your Prompt Library #
Keep a document with prompts that work well:
MY SUCCESSFUL PROMPTS

FEATURE ADDITION:
"Add [feature] that [does X] while maintaining all current functionality and mobile responsiveness"

BUG FIXING:
"Fix [issue]: Expected [behavior], but getting [actual]. Console shows [error]. Please fix while keeping all features working."

PERFORMANCE:
"Optimize for Lighthouse performance score above 80. Current issues: [list]. Maintain all functionality."

STYLING:
"Update styling to be more [adjective] with [specific changes] while keeping responsive design intact."
Success Metrics #
Technical Success #
- All PRD features implemented ✓
- Lighthouse scores meet targets ✓
- No critical bugs ✓
- Works on mobile devices ✓
User Success #
- Users complete tasks without help ✓
- Positive feedback received ✓
- Users would recommend to others ✓
- Solves the intended problem ✓
Learning Success #
- You understand the basic structure ✓
- Can make simple modifications ✓
- Know how to deploy updates ✓
- Can troubleshoot basic issues ✓
Conclusion #
Vibe coding democratizes software development, enabling anyone with an idea to build functional applications. By following this structured approach, you can create secure, accessible, and performant applications without traditional coding skills.
Key Takeaways #
- Start Small: Your first app doesn’t need to be perfect
- Test Often: Catch issues early when they’re easier to fix
- Listen to Users: Their feedback is your most valuable asset
- Document Everything: Future you will thank present you
- Keep Learning: Each project makes you better
Your Journey Forward #
Week 1-2: Build your first simple application Month 1: Complete your MVP and get user feedback Month 2-3: Iterate based on feedback and add features Month 4+: Decide whether to continue with vibe coding or transition to professional development
Remember #
- Vibe coding is a tool, not a replacement for all development
- Perfect for prototypes, great for small applications
- Security and performance matter, even for simple apps
- User feedback is gold, collect it early and often
- You can build useful things, regardless of technical background
Getting Help #
Community Resources:
- Tool-specific documentation and tutorials
- Developer communities and forums
- Accessibility and security guidelines
- Performance optimization resources
When to Seek Professional Help:
- Complex security requirements
- Large-scale user management needs
- Integration with enterprise systems
- Compliance with industry regulations
Appendices #
Appendix A: Glossary of Terms #
- API: Application Programming Interface - how different software talks to each other
- Deployment: Making your application available on the internet
- Local Storage: Browser’s way of saving data on user’s computer
- PRD: Product Requirements Document - your application’s blueprint
- Responsive: Design that works on all screen sizes
- UI/UX: User Interface/User Experience - how your app looks and feels
- Validation: Checking that user input is correct and safe
- Wireframe: Basic visual outline of your application
Appendix B: Resources and Links #
AI Coding assistants
- Bolt.new: bolt.new
- Lovable AI: lovable.dev
- Replit: replit.com/
- ChatGPT: chat.openai.com
- Claude: claude.ai
- Google Gemini: gemini.google.com
Testing Tools
- Lighthouse: Built into Chrome DevTools
- WAVE: wave.webaim.org
- Pagespeed: Pagespeed
- CodePen: codepen.io
Deployment Platforms
- Netlify: netlify.com
- Vercel: vercel.com
- GitHub Pages: pages.github.com
Learning Resources
- MDN Web Docs: developer.mozilla.org
- W3Schools: w3schools.com
- FreeCodeCamp: freecodecamp.org
This handbook is designed to evolve with the rapidly changing AI landscape. Version 1.0 - Updated for 2025
Remember: The goal isn’t to become a professional developer overnight. It’s to empower you to build useful applications that solve real problems. Start small, be patient with yourself, and celebrate each working feature as a victory.